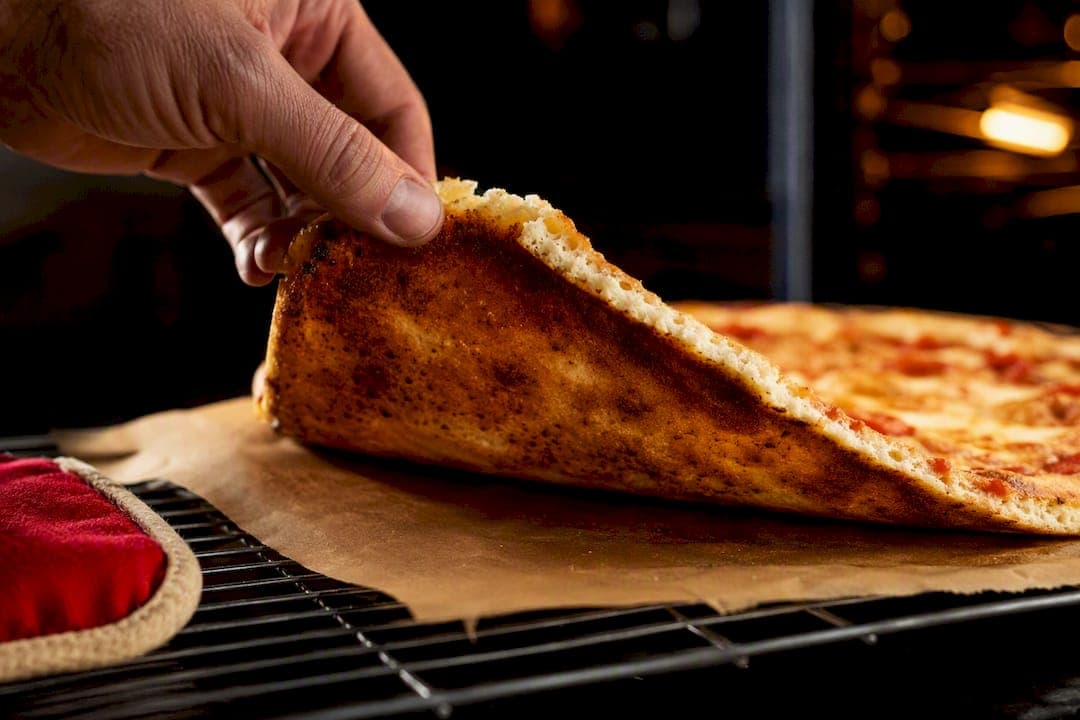
Use a yeast-leavened, psyllium-stabilized rice, tapioca, and cassava blend at high hydration, then par-bake before topping. That combination gives you a crisp bottom with a genuinely chewy centre, something quick baking-powder crusts rarely achieve because they never build the gas structure yeast does. The essential move is treating the dough as wet batter, not a wheat-style ball, and getting it onto a screaming-hot surface twice: once to set, once to finish.
TL;DR:
- Fully hydrate the flour blend and allow the psyllium gel to set before mixing to avoid gummy centers or dry edges.
- Par-baking the crust for 8 to 10 minutes at high heat is essential to achieve a crisp bottom without drying out the middle.
- Using hot surfaces like a preheated stone or cast iron pan significantly improves crust texture and browning.
- Underhydration, insufficient resting, or low oven temperature are the main causes of tearing, sogginess, or mushy crusts.
- Make-ahead options include refrigerating or freezing shaped dough or par-baked crusts, with reheating taking less than 15 minutes.
Table of Contents
- How do you make gluten-free pizza crust from scratch?
- Why gluten-free crust needs the right flour and binder mix
- What's the right way to mix, proof, and shape the dough?
- How do you get a crisp bottom without drying out the middle?
- Why is my gluten-free crust tearing, gummy, or soggy?
- Can you make gluten-free crust vegan, egg-free, or with cauliflower?
- How do you store and freeze gluten-free pizza dough?
- Who's behind this recipe and why it works
- What I'd tell a first-time gluten-free baker
- When buying beats baking: HellCrust Pizza's own crust
- Sources
How do you make gluten-free pizza crust from scratch?
A reliable gluten-free pizza base comes down to five things done in order: hydrate the flour blend fully, let the psyllium gel work, proof the yeast properly, par-bake on a hot surface, then finish under high heat with toppings. Skip any one of these and you get the two classic failures: a gummy centre or a cracker-dry edge. Here is the version we come back to at HellCrust Pizza's test kitchen table, scaled for one 12 inch pizza with enough dough for a slightly thicker Sicilian-style edge if you want it.
Ingredients (makes one 12 inch crust):
- 280 g gluten-free pizza flour blend (rice, tapioca, and cassava starch combination, or a premixed pizza-specific gluten-free flour)
- 10 g psyllium husk powder (not whole husk)
- 7 g instant yeast
- 5 g fine sea salt
- 5 g granulated sugar
- 15 g olive oil, plus extra for the bowl and pan
- 320 g warm water (about 40°C / 105°F)
- Rice flour or cornstarch, for dusting
If you reach for a commercial gluten-free flour formulated specifically for pizza, check the bag. Many already include a binder and a raising agent, which changes your math. King Arthur's gluten-free pizza flour, for instance, is built to hydrate, set, and crisp without a long proof, so you may need to cut the added psyllium or yeast the recipe below calls for. Read the label before you start mixing, not after.
Method:
- Bloom the yeast. Stir the yeast and sugar into the warm water. Let it sit for 5 to 10 minutes until foamy. If nothing happens, the water was too hot or the yeast is dead. Start over.
- Hydrate the psyllium. In a separate small bowl, whisk the psyllium powder into about 60 g of the warm water (pulled from the total). It will thicken into a gel within a minute. This gel is doing the job gluten would normally do, holding the crumb together and giving the dough enough stretch to shape.
- Combine. In a stand mixer or large bowl, whisk the flour blend and salt. Add the yeast mixture, the psyllium gel, and the olive oil. Mix on medium for 3 to 4 minutes, or by hand with a sturdy spoon for about 5. The dough should look more like thick pancake batter than a wheat dough ball. That is correct, not a mistake.
- Rest, then proof. Cover the bowl and let the dough rest for 10 minutes so the starches finish absorbing water. Then set it somewhere warm to proof for 45 to 60 minutes, until it has visibly loosened and shows small bubbles at the surface.
- Shape on parchment. Oil a sheet of parchment paper generously. Scoop the dough onto it and, with wet or oiled hands, press outward from the centre. A metal pizza ring or a cake pan collar helps you hold a clean edge if the dough wants to spread. Aim for even thickness, roughly 1 cm, thinner if you like a cracker-style base.
- Par-bake. Slide the parchment and dough (using a peel or the back of a baking sheet) onto a pizza stone or steel preheated at a high temperature for an extended time. Par-bake for 8 to 10 minutes, until the surface looks set and dry and the edges have started to colour.
- Top and finish. Pull the crust, add sauce, cheese, and toppings, then return it to the hot stone for several minutes until the cheese browns and the underside is firm when you lift a corner with a spatula.
Timing at a glance:
- Active prep: 20 minutes
- Rest: 10 minutes
- Proof: until it has visibly loosened and shows small bubbles at the surface
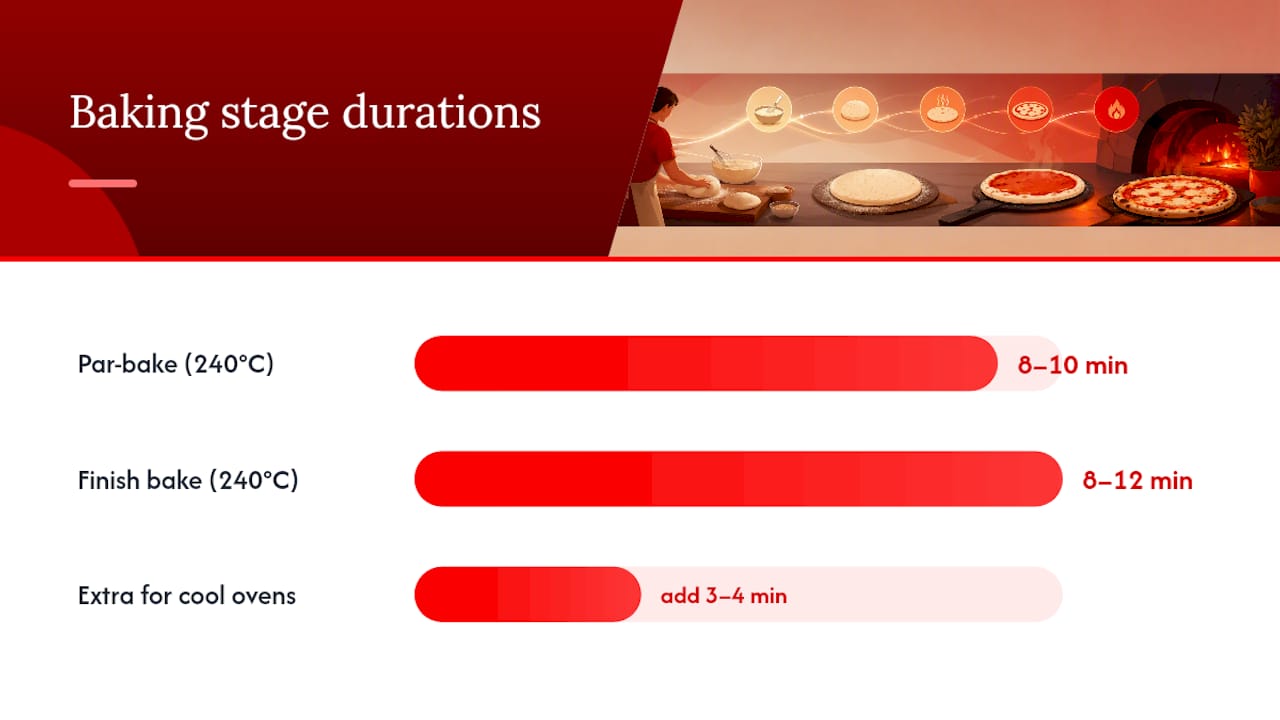
- Par-bake: 8 to 10 minutes
- Finish bake: 8 to 12 minutes
- Total, start to slice: about 1.5 hours
Make-ahead options save you most of that wait on a weeknight. You can refrigerate the shaped, unbaked dough overnight, covered, and let it come to room temperature for 20 minutes before par-baking. You can also freeze the dough after shaping, or freeze fully par-baked crusts stacked with parchment between them using a non-stick silicone bread loaf pan to keep your dough easy to handle. Thaw par-baked crusts at room temperature for 15 minutes, then go straight to the finish bake, no need to par-bake twice.
Why gluten-free crust needs the right flour and binder mix
No single gluten-free flour behaves like wheat flour on its own, which is why blends outperform straight rice flour or straight cassava flour every time. Rice flour brings a clean, neutral base and decent structure but turns gritty in isolation. Tapioca starch adds chew and a bit of stretch. Cassava contributes a softer, more bread-like crumb. Combine the three and you get something closer to wheat's balance of structure and give, which is exactly the logic behind most pizza-specific gluten-free dough blends.
Binders do the work gluten normally does: holding water, trapping gas, and giving the dough enough cohesion to stretch instead of tear.
- Psyllium husk powder hydrates into a thick gel that mimics gluten's elasticity closely, and it is the binder most yeast-leavened gluten-free pizza recipes lean on for a chewy, bread-like result.
- Xanthan gum works faster and needs less quantity, but it tends to produce a slightly gummier, more uniform crumb rather than an open, chewy one.
- Flax or chia "eggs" (ground seed soaked in water) add binding and a mild nutty flavour, useful in egg-free or vegan versions, though they contribute less stretch than psyllium.
- Egg, where diet allows it, adds structure and browning but can make the crumb denser if overused.
Hydration is where most home bakers underperform their own recipe. Gluten-free pizza dough typically needs a noticeably higher water-to-flour ratio than wheat dough because these starches simply absorb more liquid before they behave workably, and a dough that looks too wet to you is usually the one that bakes correctly. HellCrust Pizza's own hydration guide breaks down the 60–70% starting range most home ovens handle well, and gluten-free blends often sit at the higher end of that band or above it. Too little water and the crumb bakes dry and crumbly; too much, uncorrected, gives you a soggy middle no amount of oven heat fixes on its own.
Oil and sugar are supporting players, not headline ingredients. Oil tenderizes the crumb and helps browning; sugar feeds the yeast and rounds out flavour, but a gram or two either way will not make or break the bake.
Pro Tip: If your dough looks like it will never hold a shape, resist the urge to add flour. Let it rest 10 more minutes instead. Gluten-free starches keep absorbing water well after mixing stops, and a dough that seems hopeless at minute two often firms up nicely by minute twelve.
What's the right way to mix, proof, and shape the dough?
Mixing gluten-free dough correctly means watching texture, not chasing a wheat-dough ideal. You are done mixing once the batter looks uniformly thick and slightly glossy, with no dry pockets of flour visible. Overmixing will not build gluten strands you do not have, so there is no real downside to a shorter mix, but undermixing leaves the psyllium gel unevenly distributed, which shows up later as patchy texture in the baked crust.
- Whisk dry ingredients first so the yeast, salt, and flour are evenly distributed before any liquid goes in.
- Add wet ingredients gradually, scraping the bowl sides, until the mixture pulls together into a thick, pourable batter.
- Check the psyllium gel separately before folding it in. It should be spoonable, not runny. A watery gel means it needs another minute to set.
- Fold, don't knead. A stiff spoon or spatula does the job. Kneading a gluten-free dough achieves nothing structurally useful.
- Watch for the proof signs, not the clock alone: the dough should look about 30% larger, feel airier when you press it gently, and hold a small dimple after a light poke.
Yeast-leavened dough rewards patience during that 45 to 60 minute proof window. In a cool kitchen, give it closer to 75 minutes; near a warm oven or on a sunny windowsill, check at 40. Underproofed dough bakes dense; overproofed dough can collapse slightly when it hits the hot stone, though gluten-free dough is more forgiving of a slightly long proof than wheat dough is.
A quick, baking-powder-leavened version skips the proof entirely and gets you eating 30 minutes faster, which matters on a weeknight. The trade-off is real: without yeast fermentation building gas pockets slowly, the crumb turns out flatter and denser, closer to a flatbread than a pizzeria-style base. It is a fair swap for speed, not for texture.
Shaping is where wet hands beat a rolling pin every time. Gluten-free dough sticks to a pin and tears at the edges; it presses out cleanly with damp fingers on oiled parchment. A metal tart ring, a springform collar, or even a cake pan pressed gently around the dough's edge gives you a clean, even circle without fighting the stickiness. Work from the centre outward in a spiral motion, checking thickness by eye rather than by feel, since gluten-free dough won't spring back the way wheat dough does to tell you when it's thin enough.
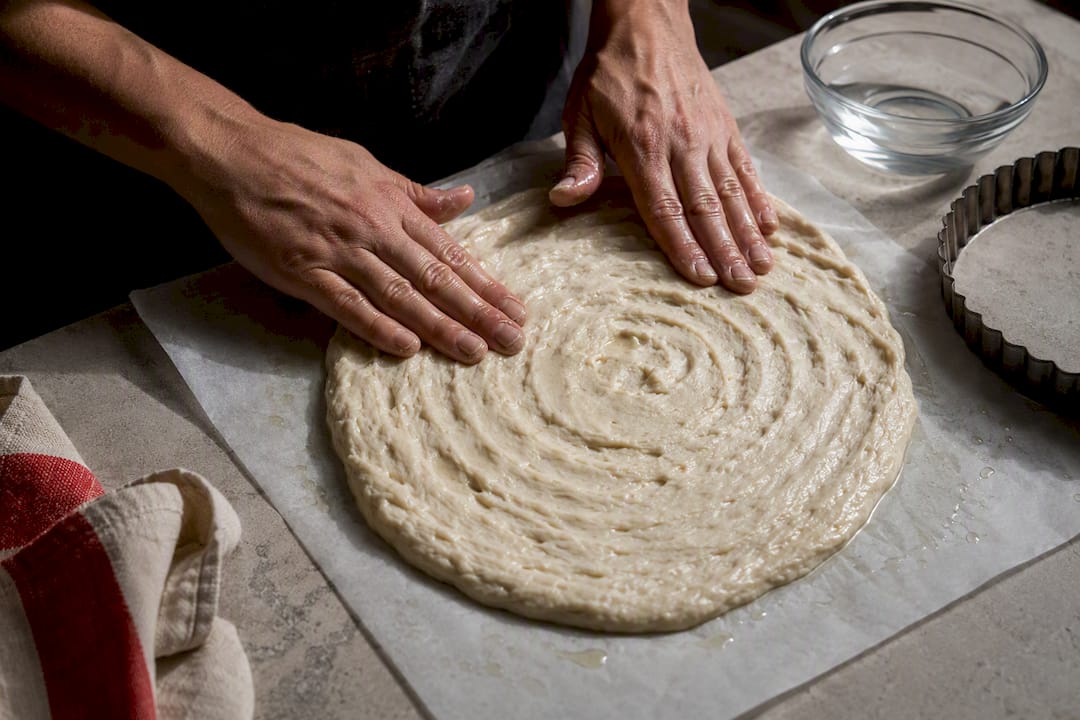
Pro Tip: Keep a small bowl of water next to your workspace and dip your fingertips between presses. Re-wetting every 20 seconds or so stops the dough from sticking to your hands without adding extra moisture to the dough itself.
For the baking surface, a preheated pizza stone or steel gives the most even, driest heat and the crispest bottom because it holds heat well and pulls moisture out of the dough on contact. Cast iron is the strong second choice, especially in a home oven that struggles to hold high heat evenly, since the pan's mass keeps temperature steady even after the door opens and closes. A perforated pizza pan helps air circulate under thinner crusts but won't match a stone's crust colour on a home oven's typical top temperature. Preheat any of these for a full 45 minutes minimum. A stone that has only had 10 minutes to heat will not give you the sear you are after.
How do you get a crisp bottom without drying out the middle?
Crisping a gluten-free crust is really a heat-transfer problem: you need the base to lose surface moisture fast while the interior finishes cooking gently, and that only happens with a genuinely hot surface making direct contact with the dough. A home oven's air temperature reading and its stone's actual surface temperature are different things, which is why the preheat time matters as much as the dial setting.
Par-baking exists to solve exactly this. Baking the naked crust for 8 to 10 minutes at 240°C (450°F) sets the structure and dries the surface before any toppings add their own moisture back in. Skip this step and load a raw gluten-free base with sauce and wet mozzarella, and you are almost guaranteed a soggy centre, since the crumb never gets a chance to firm up before it's buried under liquid.
You'll know a par-bake is done by sight and touch, not just the timer:
- The surface looks matte and dry, not shiny or wet.
- The edges have started to take on light golden colour.
- Pressing the centre gently gives slight resistance instead of sinking in.
The finish bake, typically 8 to 12 minutes at the same high heat, is where cheese browns and toppings cook through. If your oven runs cool or uneven, a two-minute broil at the very end evens out pale spots on the cheese without pushing the crust past done. Watch it closely under broil; gluten-free crusts can go from perfectly browned to burnt in under a minute because the crumb structure has less moisture buffer than wheat dough.
Home ovens that cap out around 220°C (425°F) still work, they just need longer at each stage. Add 3 to 4 minutes to both the par-bake and finish bake, and lean harder on a preheated stone or cast iron to make up for the lower air temperature. Moisture content itself drives a measurable amount of the texture difference between a crisp base and a limp one, with even small shifts in hydration changing specific volume, hardness, and stickiness in gluten-free baked goods, which is exactly why the par-bake step and the hot surface both matter more here than they would with wheat dough.
Why is my gluten-free crust tearing, gummy, or soggy?
Most failures trace back to one of three things: hydration, resting time, or oven heat. Match the symptom below to the likely cause before you blame the recipe itself.
- Tearing when shaping: the dough is underhydrated, or too much dusting flour got worked in. Wet your hands, press a little water into the surface, and let it rest 10 minutes before trying again.
- Gummy, dense crumb after baking: usually too much liquid relative to flour, or the par-bake was skipped or cut short. Extend the par-bake by 2 to 3 minutes next time and check the dough felt properly proofed before it went in.
- Dry, crumbly texture: the opposite problem, often from too much added flour during shaping or an overlong bake. Cut back on dusting flour and dial the oven check earlier next round.
- Soggy centre despite a good par-bake: almost always wet toppings. Pre-cook mushrooms and any watery vegetables, and pat fresh mozzarella dry before it goes on.
- Dough won't hold together at all: the psyllium gel was likely too thin or under-measured. Increase psyllium by 1 to 2 grams and make sure the gel had a full minute to thicken before mixing it in.
Binder adjustments are safe to make in small steps: add or reduce psyllium by no more than 2 grams at a time between bakes, since a jump larger than that changes the dough's behaviour more than most home cooks expect. Humid climates may need slightly less water in the psyllium gel; dry winter air in a heated house often needs a touch more, since gluten-free flours pull ambient moisture more readily than wheat flour does. Before you troubleshoot the dough itself, run through a short checklist: was the water genuinely warm, not hot; did the psyllium gel fully set; did the dough get its full rest; was the stone actually preheated for 45 minutes. Nine times out of ten, the fix is on that list.
Can you make gluten-free crust vegan, egg-free, or with cauliflower?
Vegan and egg-free versions of this crust work well because the base recipe above never called for eggs in the first place. Psyllium gel alone does the binding job, so a straight swap is rarely needed. If a variant recipe you're adapting does call for egg, a flax "egg" (1 tbsp ground flax whisked into 3 tbsp water, rested 5 minutes) or 3 tbsp of aquafaba, the liquid from a can of chickpeas, both work as replacements, though expect a slightly less structured crumb than egg gives.
Cauliflower crust is a different animal entirely, not a gluten-free wheat substitute so much as its own category. Riced, cooked, and squeezed-dry cauliflower gets bound with cheese, egg (or a vegan binder), and a small amount of gluten-free flour, then pressed thin and baked. It has real structural limits: it holds up under light toppings like a thin layer of sauce, cheese, and herbs, but sags under a loaded Meat Lover's-style pizza. If your household wants variety without much decision fatigue, HellCrust Pizza's topping guidance is worth a look before you commit a cauliflower base to anything heavier than a margherita.
Cassava-forward, lower-glycemic-leaning versions swap more of the rice and tapioca for cassava starch, which changes moisture behaviour enough that you'll want to watch hydration more closely than usual, adding water in smaller increments and checking the dough's feel at each addition rather than following gram measurements blindly.
Frozen pre-made gluten-free crusts are a legitimate shortcut on nights when scratch baking isn't happening. Expect a denser, less chewy result than fresh dough gives you, since most commercial versions are optimized for shelf stability over texture, but a quick finish bake on a hot stone still improves them noticeably over the package instructions alone.
How do you store and freeze gluten-free pizza dough?
- Refrigerate raw, shaped dough up to 24 hours, covered tightly; the slow, cool proof actually improves flavour slightly, similar to a slow ferment in wheat dough.
- Freeze raw dough shaped into discs, wrapped individually in plastic then a freezer bag, for up to 2 months. Thaw overnight in the fridge before proofing normally.
- Freeze par-baked crusts stacked with parchment between layers to prevent sticking or freezer burn; these go from freezer to topped and finished in under 15 minutes.
- Reheat leftover slices in a dry cast-iron skillet over medium heat for 3 to 4 minutes, or a 200°C (400°F) oven for 6 to 8 minutes. Both beat the microwave, which turns gluten-free crust rubbery almost immediately.
Who's behind this recipe and why it works
This recipe comes from jaskirat Singh, drawing on hands-on baking notes built up through HellCrust Pizza's own kitchen practice and blog work on dough technique. A professional pizza chain bakes its own pizzas from a multigrain, additive-free dough, so the same core principles, honest hydration, patience with proofing, real heat at bake time, carry directly across from commercial kitchens to home ovens.
If you want to go deeper on any one variable rather than tweaking the whole recipe at once, a few internal reads are worth bookmarking:
- Pizza dough hydration, for the water-to-flour ratios that govern texture
- Extra crispy pizza, for oven and stone setup specifics
- What makes dough additive-free, for the ingredient philosophy behind clean-label crusts
- Fermentation in pizza dough, for the proofing science behind gas retention and crumb structure
What I'd tell a first-time gluten-free baker
The learning curve here is real, but it's short, and it's front-loaded. Once you've felt what properly hydrated dough looks like and watched a par-bake go from wet-looking to matte and set, you basically have the whole technique. Those two moments are where almost everyone gets stuck the first time, and they're also the two things that click fastest once you've seen them succeed once.
Change one variable at a time. If a bake goes wrong, don't rework the flour blend, the hydration, and the oven temperature all in the same session, or you'll never know which fix actually mattered. Write down what you changed and what happened. Two or three bakes in, you'll have a version dialled in for your specific oven, which is really the whole point.
Start with the How do you make gluten-free pizza crust from scratch? exactly as written before you improvise. It's built to be forgiving on a first attempt.
— jaskirat Singh
When buying beats baking: HellCrust Pizza's own crust
Some nights, the smarter move is skipping the flour altogether. Some pizza services bake every pizza on a multigrain, artificial additive-free dough, made fresh in their kitchens and delivered or ready for pickup through an app, so you get the crisp-yet-chewy result this whole recipe chases without the mixing bowl, the proof timer, or a stone that needs 45 minutes to heat.

That trade-off makes the most sense on a weeknight with no time for a proof cycle, when your oven can't hold consistent high heat, or when you're feeding a group and don't want to par-bake four crusts back to back. Mix & Match deals and family-sized specials also mean you can order gluten-free alongside regular crusts in one go, so nobody at the table has to compromise. If tonight is a buy-it night rather than a bake-it night, order through HellCrust Pizza and let the dough be someone else's job for once.
Sources
- Gluten-free pizza dough: flours and binders — PizzaPlan
- Gluten-Free Pizza Flour — King Arthur Baking